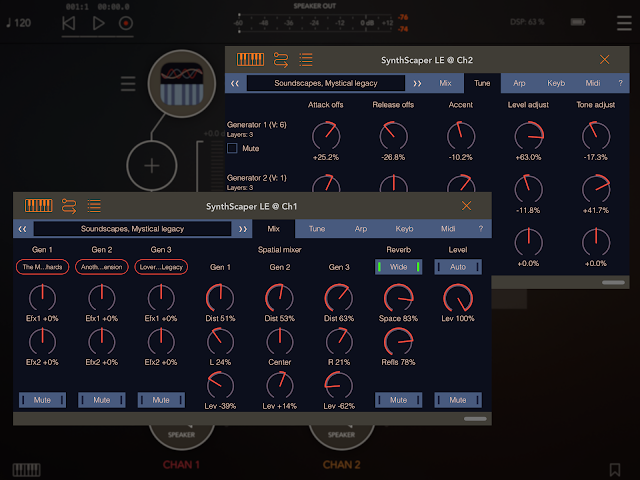
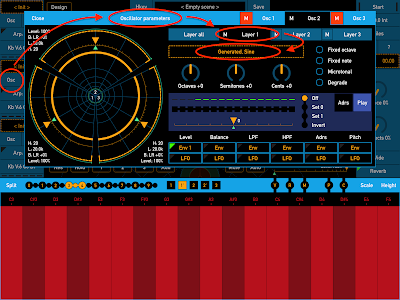
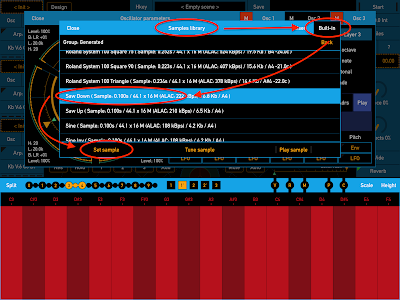
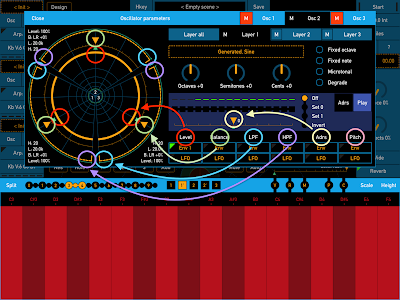
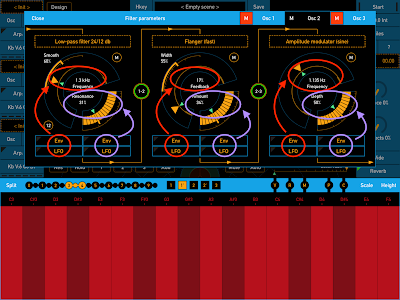
Easily create and tune your own multi-timbral pads and atmospheric soundscapes with the special lite version of SynthScaper LE. No need to construct a new sound from the beginning. Just use the built-in library of unique and high quality presets. Three sound generators each works as a separate synth, easy to use tune panel, advanced sequencer / arpeggiator, MIDI controls, Inter-App audio, Audiobus and Audio Unit!
Standalone app can auto detecting MIDI keyboards and automatically assign its controls. First, a few models, then there will be more. And you always can use any others by assign them manually.
Completely compatible with advanced version of SynthScaper. You can import scenes and its samples from this version to SynthScaper LE.
SynthScaper + SynthScaper LE bundle. Owners of advanced version SynthScaper can get SynthScaper LE by very low price.
New SynthScaper LE expected in mid-January.
Monday, December 31, 2018
Thursday, November 22, 2018
Sale!
SynthScaper >> More about this app >> App Store
Soundscapes synthesizer
FieldScaper >> More about this app >> App Store
Field recorder & Scapes constructor
SoundScaper >> More about this app >> App Store
Experimental sound mini lab
Audio Mastering >> More about this app >> App Store
High-quality tool for refine tracks
AltiSpace >> More about this app >> App Store
Convolution Reverb
Master FX >> More about this app >> App Store
Classic sound effects
Master Record >> More about this app >> App Store
Tape simulation effect
Friday, November 9, 2018
Recording video demo
Usually I record video demo on iPhone with use FiLMic Pro app. iPhone mounted in "Tarion C1" cage on tripod (just usual tripod). I use additional 37mm wide angle lens and graduated color filter to slightly hide some area. To iPhone is connected "Lightning to USB 3 Camera Adapter" that also charge iPhone during work. External USB audio interface "Alesis iO Hub" connected to this adapter and get power not from the iPhone battery but through charger.
With using this setup I can record video with high quality audio directly from sound devices, mix console for example (or from iPad in this demo). The final processing of the video I do in iMovie app on Mac or even right on iPhone if it's not required complex editing.
The final result:
SynthScaper is a synthesizer specially designed for creating and experiments with ambient soundscapes in wide range from noises to melodic instruments and everything in between.
>>> More details about SynthScaper
With using this setup I can record video with high quality audio directly from sound devices, mix console for example (or from iPad in this demo). The final processing of the video I do in iMovie app on Mac or even right on iPhone if it's not required complex editing.
Recording demo of SynthScaper app
The final result:
SynthScaper is a synthesizer specially designed for creating and experiments with ambient soundscapes in wide range from noises to melodic instruments and everything in between.
>>> More details about SynthScaper
Tuesday, November 6, 2018
SoundScaper tutorial
SoundScaper is an experimental sound mini lab designed for creating unusual soundscapes, atmospheric textures, drones, glitches and noises based on circuit bending ideas.
With this app you can easily experiment with creating new and unusual sounds from ordinary audio samples. For sound designers and those interested in creating ambient or experimental electronic music, with filtering and mixing of up to three oscillators, you can create excellent soundscapes, textures and drones for your music or for movie soundtrack or entertainment apps and games. Complete MIDI control make this app is very comfortable and powerful instrument to use for real-time sound creation and live performances.
The advanced feature "Morphing scene" gives you ability to smooth switching between scenes with applying multifunctional filters and changing oscillators parameters during morphing process. With use this feature you can add a new dimension to the existing scenes.
[ Complete description of SoundScaper 1.8 in one PDF file ]
The most comprehensive SoundScaper tutorial

Wednesday, October 3, 2018
SynthScaper - Tutorials and How-To's
Synthesizer specially designed for creating and experiments with ambient soundscapes in wide range from noises to melodic instruments and everything in between.
The sound engine of SynthScaper has its own unique sounding differ from any other software synths. You can construct outstanding melodic pads or atonal soundscapes from different kind of built-in or downloaded samples by using all power of multi-layered oscillators, chains of filters and effects, envelope generators and low frequency oscillators.
SynthScaper Tutorial: Part 1 - A moderately detailed walkthrough of the main features of SynthScaper on iOS.
SynthScaper Tutorial: Part 2 - Digging deeper with SynthScaper. Looking at: (1) LFO setup, (2) Using Effect 1 and Effect 2 virtual controls to modulate multiple simultaneous parameters, and (3) Dissecting some presets to get inspiration.
SynthScaper How-To's:
[ SynthScaper - Wide and deep sound with the single preset (guide with pictures) ]
[ SynthScaper - Natural chorus and Spatial effects (guide with pictures) ]
[ SynthScaper - How to assign "LFO" to parameters (guide with pictures) ]
[ SynthScaper - How to use "Effect" parameters (guide with pictures) ]
[ SynthScaper - Two-Voiced Drone (guide with pictures) ]
[ SynthScaper - Start with your own samples (guide with pictures) ]
[ SynthScaper - The Designer tool (short description) ]
[ SynthScaper - Arpeggiator / Sequencer overview (video demo) ]
[ SynthScaper - Automate pitch shifting (video demo) ]
[ SynthScaper - One shot sample demo (video demo) ]
[ SynthScaper modules connection diagram (big picture) ]
[ Complete description of SynthScaper 1.7 in one PDF file ]

Sunday, September 16, 2018
SynthScaper - Wide and deep sound with the single preset
With the SynthScaper app it's very easy to make new scene with wide and deep sound using just one of oscillator presets from the built-in library that you liked. It's enough to change it a little to use in all three oscillators to get a more complex sound.
SynthScaper - Soundscapes synthesizer specially designed for creating and experiments with ambient soundscapes in wide range from noises to melodic instruments and everything in between.
In this example we will make the new scene with sound space which contains one oscillator in foreground and two oscillators in the background. For this scene we will use just one oscillator preset from built-in library.
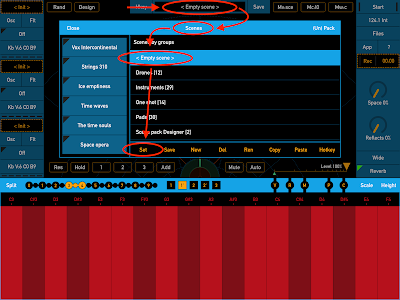
1. Set "Empty scene"
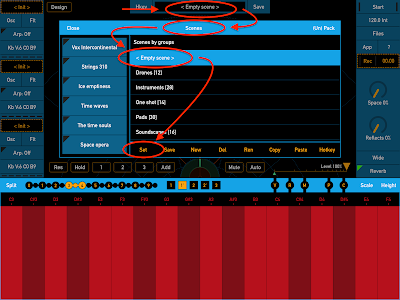
The best way to start creating a new scene is to use the initial settings of all parameters to make the oscillator work in simple mode, and no any settings affect it. The special scene "Empty scene" sets the initial values of all parameters. In this scene oscillators "1" and "3" are muted, and for oscillator "2" is used only first layer with sine waveform. Filters, Envelopes and LFOs are not assigned (except for the base Envelope generator for the parameter "Level").
From the list of scenes select "Empty scene" to set all parameters to initial values.
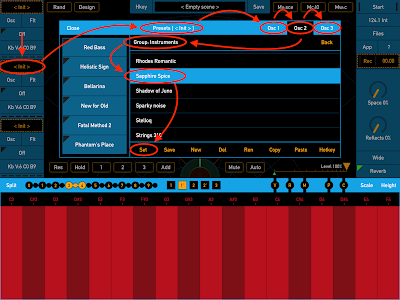
2. Set preset for oscillators
At first set the same preset for all three oscillators. For this example was used preset "Instruments - Sapphire Spice". For next experiments with sounds you can choice other preset for two background oscillators "1" and "3" and leave the same preset for foreground oscillator "2".
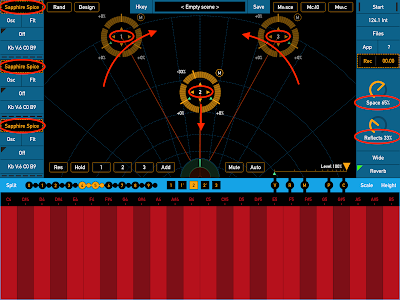
3. Adjust spatial mixer
In the spatial mixer area place the foreground oscillator "2" in the center and closer to the listener (closer to the bottom of area). Two background oscillators "1" and "3" place further from the listener and slightly move them to the center. You can experiment with placing these oscillators closer to the center or closer to the left and right side. Thus you can change wide of sound space.
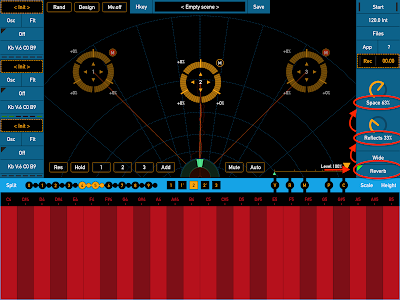
At the right panel set parameter "Space" of spatial mixer in about to "65%" and parameter "Reflects" to "33%". Try to change these parameters after you completely make the scene from this example. These parameters set the depth of sound space and amount of reflections in this space.
Please note that all three oscillators have the same preset.
Don't forget unmute oscillators "1" and "3" that are muted in the "Empty scene".
4. Alter background oscillators
In these next steps you should alter the background oscillators "1" and "3" so them have a slightly differ sounding from foreground oscillator.
When you use the same preset for all oscillators the easy trick is to delay the start of voices for background oscillators and make it more smoothly.
This is done with the envelope generator which was assigned to the parameter "Level" for all layers. You need change Envelope for two background oscillators.
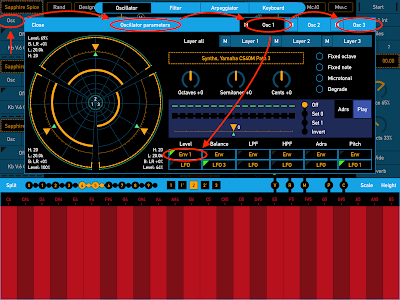
5. Change envelope for oscillators level
In the panel "Envelope parameters" for parameter "Level" make sure that you will change parameters of the envelope generator "1" which was assigned for the parameter "Level" by default. Also make sure that you change it for all layers of the oscillator "1" (label above parameter knob "O1La Level") and then oscillator "3" (label will be "O3La Level").
Set the parameter "Delay" to about "0.126s". This will cause that when you press a key any voice of oscillator "1" will starts not at once but with specified delay.
Next slightly increase parameter "Attack" up to "0.736s". This makes start of the voices more smoothly.
Set the same values of "Delay" and "Attack" for both oscillators "1" and "3". After this the voices of background oscillators will starting a bit later and more smoothly than voices of foreground oscillator "2".
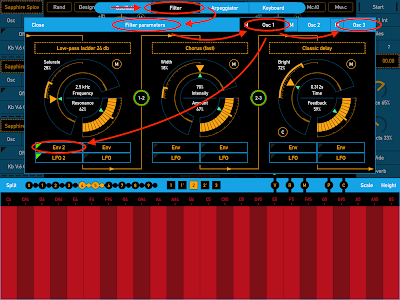
6. Alter filters
Also if in the preset are defined another envelopes for filters it's best change them too. This will allow the base of sound to remain the same for all oscillators. For this example you need change the envelope for filter slot "1" for oscillators "1" and "3".
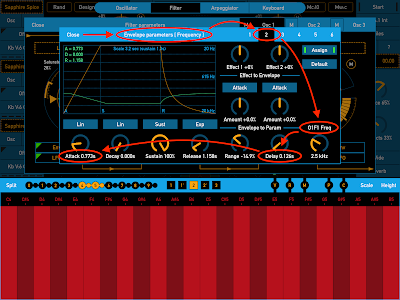
7. Change envelope for filters
In the panel "Envelope parameters" for parameter "Frequency" make sure that you will change parameters of the envelope generator "2" which was assigned for the parameter "Frequency" of the oscillator "1" and filter slot "1" (label above parameter knob "O1F1 Freq") and then oscillator "3" (label will be "O3F1 Freq").
Set the parameter "Delay" to about "0.126s". It should be the same value that in the envelope generator "1" which has assigned for the parameter "Level".
Next slightly increase parameter "Attack" up to "0.773s". This value may differ from the value in envelope generator "1".
Set the same values of "Delay" and "Attack" for both oscillators "1" and "3". After this the frequency of filter for background oscillators will start changing a bit later and more smoothly than for foreground oscillator "2".
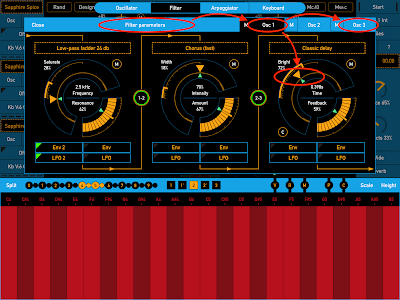
8. Change filters parameters
It's also a good idea to make the sound of background oscillators more blurry. If them uses delay effect try to slightly increase time of delay for these oscillators.
Also you can try slightly change parameters of other effects such as "Chorus" or "Flanger". For background oscillators try to increase parameters "Intensity" or "Width". First, set the same values for both of these oscillators.
The basic idea in that the background oscillators have identical parameters.
9. Shift tone of background oscillators
The main change for background oscillators is to set them to one octave lower than foreground oscillator. Set the parameter "Octave" to "-1" for oscillators "1" and "3". After that, any pressed key will sent to these oscillators with an offset one octave lower.
And for more saturated sound a slightly tweak the offset in cents for oscillator "1" to "-3" and for oscillator "3" to "+4". When constructing the scene will be completed try to change these values to set a greater or lesser dissonance for background oscillators and listen to the result.
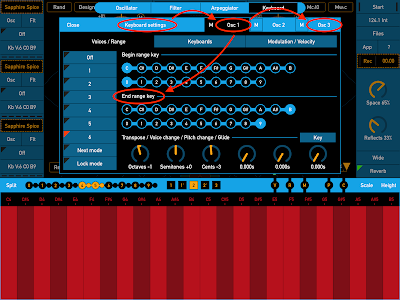
10. Split the keyboard
For more advanced use SynthScaper with MIDI keyboard you can split keyboard range on two. Some lower part for background oscillators and the rest for foreground.
For that for background oscillators "1" and "3" leave the "Begin range key" in "C0" and set the "End range key" for example in "B3". For foreground oscillator "2" set the "Begin range key" in "C4" and leave the "End range key" in "B9". So you can play notes for background sound on the lower part of keyboard and play foreground chords on the upper part.
You can use any divide key as it will be convenient for you.
The SynthScaper is just created for various experiments with sound. Feel free to try new ways of configure this app and you will be able to get a more interesting result than with any other synths.
See also:
[ SynthScaper - Natural chorus and Spatial effects (guide with pictures) ]
[ SynthScaper - How to assign "LFO" to parameters (guide with pictures) ]
[ SynthScaper - How to use "Effect" parameters (guide with pictures) ]
[ SynthScaper - Two-Voiced Drone (guide with pictures) ]
[ SynthScaper - Start with your own samples (guide with pictures) ]
[ SynthScaper - The Designer tool (short description) ]
[ SynthScaper - Arpeggiator / Sequencer overview (video demo) ]
[ SynthScaper - Automate pitch shifting (video demo) ]
[ SynthScaper - One shot sample demo (video demo) ]
[ SynthScaper modules connection diagram (big picture) ]
[ Complete description of SynthScaper 1.7 in one PDF file ]

SynthScaper - Soundscapes synthesizer specially designed for creating and experiments with ambient soundscapes in wide range from noises to melodic instruments and everything in between.
In this example we will make the new scene with sound space which contains one oscillator in foreground and two oscillators in the background. For this scene we will use just one oscillator preset from built-in library.
1. Set "Empty scene"
The best way to start creating a new scene is to use the initial settings of all parameters to make the oscillator work in simple mode, and no any settings affect it. The special scene "Empty scene" sets the initial values of all parameters. In this scene oscillators "1" and "3" are muted, and for oscillator "2" is used only first layer with sine waveform. Filters, Envelopes and LFOs are not assigned (except for the base Envelope generator for the parameter "Level").
From the list of scenes select "Empty scene" to set all parameters to initial values.
You can click on any image to enlarge it
2. Set preset for oscillators
At first set the same preset for all three oscillators. For this example was used preset "Instruments - Sapphire Spice". For next experiments with sounds you can choice other preset for two background oscillators "1" and "3" and leave the same preset for foreground oscillator "2".
3. Adjust spatial mixer
In the spatial mixer area place the foreground oscillator "2" in the center and closer to the listener (closer to the bottom of area). Two background oscillators "1" and "3" place further from the listener and slightly move them to the center. You can experiment with placing these oscillators closer to the center or closer to the left and right side. Thus you can change wide of sound space.
At the right panel set parameter "Space" of spatial mixer in about to "65%" and parameter "Reflects" to "33%". Try to change these parameters after you completely make the scene from this example. These parameters set the depth of sound space and amount of reflections in this space.
Please note that all three oscillators have the same preset.
Don't forget unmute oscillators "1" and "3" that are muted in the "Empty scene".
4. Alter background oscillators
In these next steps you should alter the background oscillators "1" and "3" so them have a slightly differ sounding from foreground oscillator.
When you use the same preset for all oscillators the easy trick is to delay the start of voices for background oscillators and make it more smoothly.
This is done with the envelope generator which was assigned to the parameter "Level" for all layers. You need change Envelope for two background oscillators.
5. Change envelope for oscillators level
In the panel "Envelope parameters" for parameter "Level" make sure that you will change parameters of the envelope generator "1" which was assigned for the parameter "Level" by default. Also make sure that you change it for all layers of the oscillator "1" (label above parameter knob "O1La Level") and then oscillator "3" (label will be "O3La Level").
Set the parameter "Delay" to about "0.126s". This will cause that when you press a key any voice of oscillator "1" will starts not at once but with specified delay.
Next slightly increase parameter "Attack" up to "0.736s". This makes start of the voices more smoothly.
Set the same values of "Delay" and "Attack" for both oscillators "1" and "3". After this the voices of background oscillators will starting a bit later and more smoothly than voices of foreground oscillator "2".
6. Alter filters
Also if in the preset are defined another envelopes for filters it's best change them too. This will allow the base of sound to remain the same for all oscillators. For this example you need change the envelope for filter slot "1" for oscillators "1" and "3".
7. Change envelope for filters
In the panel "Envelope parameters" for parameter "Frequency" make sure that you will change parameters of the envelope generator "2" which was assigned for the parameter "Frequency" of the oscillator "1" and filter slot "1" (label above parameter knob "O1F1 Freq") and then oscillator "3" (label will be "O3F1 Freq").
Set the parameter "Delay" to about "0.126s". It should be the same value that in the envelope generator "1" which has assigned for the parameter "Level".
Next slightly increase parameter "Attack" up to "0.773s". This value may differ from the value in envelope generator "1".
Set the same values of "Delay" and "Attack" for both oscillators "1" and "3". After this the frequency of filter for background oscillators will start changing a bit later and more smoothly than for foreground oscillator "2".
8. Change filters parameters
It's also a good idea to make the sound of background oscillators more blurry. If them uses delay effect try to slightly increase time of delay for these oscillators.
Also you can try slightly change parameters of other effects such as "Chorus" or "Flanger". For background oscillators try to increase parameters "Intensity" or "Width". First, set the same values for both of these oscillators.
The basic idea in that the background oscillators have identical parameters.
9. Shift tone of background oscillators
The main change for background oscillators is to set them to one octave lower than foreground oscillator. Set the parameter "Octave" to "-1" for oscillators "1" and "3". After that, any pressed key will sent to these oscillators with an offset one octave lower.
And for more saturated sound a slightly tweak the offset in cents for oscillator "1" to "-3" and for oscillator "3" to "+4". When constructing the scene will be completed try to change these values to set a greater or lesser dissonance for background oscillators and listen to the result.
10. Split the keyboard
For more advanced use SynthScaper with MIDI keyboard you can split keyboard range on two. Some lower part for background oscillators and the rest for foreground.
For that for background oscillators "1" and "3" leave the "Begin range key" in "C0" and set the "End range key" for example in "B3". For foreground oscillator "2" set the "Begin range key" in "C4" and leave the "End range key" in "B9". So you can play notes for background sound on the lower part of keyboard and play foreground chords on the upper part.
You can use any divide key as it will be convenient for you.
The SynthScaper is just created for various experiments with sound. Feel free to try new ways of configure this app and you will be able to get a more interesting result than with any other synths.
See also:
[ SynthScaper - Natural chorus and Spatial effects (guide with pictures) ]
[ SynthScaper - How to assign "LFO" to parameters (guide with pictures) ]
[ SynthScaper - How to use "Effect" parameters (guide with pictures) ]
[ SynthScaper - Two-Voiced Drone (guide with pictures) ]
[ SynthScaper - Start with your own samples (guide with pictures) ]
[ SynthScaper - The Designer tool (short description) ]
[ SynthScaper - Arpeggiator / Sequencer overview (video demo) ]
[ SynthScaper - Automate pitch shifting (video demo) ]
[ SynthScaper - One shot sample demo (video demo) ]
[ SynthScaper modules connection diagram (big picture) ]
[ Complete description of SynthScaper 1.7 in one PDF file ]

Wednesday, September 12, 2018
SynthScaper ver. 1.6 has been released
SynthScaper - Soundscapes synthesizer for iPad and iPhone ver. 1.6 has been released.
Synthesizer specially designed for creating and experiments with ambient soundscapes in wide range from noises to melodic instruments and everything in between.
The sound engine of SynthScaper has its own unique sounding differ from any other software synths. You can construct outstanding melodic pads or atonal soundscapes from different kind of built-in or downloaded samples by using all power of multi-layered oscillators, chains of filters and effects, envelope generators and low frequency oscillators. Or you can create your own sound scenes combining oscillators presets from build-in library. Or just use predefined scenes.
>>> More details about SynthScaper
This update adds new modes that make it more convenient to use MIDI keyboards with SynthScaper.
Buttons of these modes are placed at the right of scene area on the top of main screen and set the modes of external MIDI keyboards.
"Mv: ..." - This button enables or disables use the velocity for MIDI keyboards. By default use of velocity for MIDI keyboards is define in the panel "Keyboard settings" - "Keyboards" and stores for each scene. This button can enable or disable to use velocity regardless scene parameters and its state do not be reset when scene change.
Mode "Mv:on" defines that the velocity is always enable. Mode "Mv:off" defines that the velocity is always disable. Mode "Mv:sce" defines that use of the velocity defined by the scene.
The green marker indicates that the use of velocity is enable by this button or in the scene (in the "Keyboard settings" - "Keyboards"). The red marker indicates that use of the velocity is disable.
"Mc: ..." - This button defines the curve of velocity for MIDI keyboards. There are two modes - "Linear" marked by letter "l" and "Soft" marked by letter "s". Next number indicates mode of expanding range of velocity. The number "0" indicates no expand. Try different modes with your keyboard for more convenient use of velocity.
"Mw: ..." - This button sets the mode of use the modulation wheel on MIDI keyboards. By default the modulation wheel assigned to change Effect 1. The Effect parameters have central position "0%" and two extreme positions "-100%" and "+100%". So the modulation wheel on the keyboard should have free move to remain in last position. But if your keyboard has modulation wheel that always returned to zero position when released you can use this button to set the mode when the modulation wheel will changing the parameters from "0%" to "+100%" or from "0%" to "-100%". Mode "Mw:c" defines that the modulation wheel will changing the parameters from center position "0%" to "+100%" or "-100%" (default mode).
Mode "Mw:+" sets changing from "0%" to "+100%". Mode "Mw:-" sets changing from "0%" to "-100%". You can use these modes with any type of the modulation wheel especially if you set the initial value of Effect other than central position.
Also in this update:
Guides and demos:
[ SynthScaper - Wide and deep sound with the single preset (guide with pictures) ]
[ SynthScaper - Natural chorus and Spatial effects (guide with pictures) ]
[ SynthScaper - How to assign "LFO" to parameters (guide with pictures) ]
[ SynthScaper - How to use "Effect" parameters (guide with pictures) ]
[ SynthScaper - Two-Voiced Drone (guide with pictures) ]
[ SynthScaper - Start with your own samples (guide with pictures) ]
[ SynthScaper - The Designer tool (short description) ]
[ SynthScaper - Arpeggiator / Sequencer overview (video demo) ]
[ SynthScaper - Automate pitch shifting (video demo) ]
[ SynthScaper - One shot sample demo (video demo) ]
[ SynthScaper modules connection diagram (big picture) ]
[ Complete description of SynthScaper 1.6 in one PDF file ]

Synthesizer specially designed for creating and experiments with ambient soundscapes in wide range from noises to melodic instruments and everything in between.
The sound engine of SynthScaper has its own unique sounding differ from any other software synths. You can construct outstanding melodic pads or atonal soundscapes from different kind of built-in or downloaded samples by using all power of multi-layered oscillators, chains of filters and effects, envelope generators and low frequency oscillators. Or you can create your own sound scenes combining oscillators presets from build-in library. Or just use predefined scenes.
>>> More details about SynthScaper
This update adds new modes that make it more convenient to use MIDI keyboards with SynthScaper.
Buttons of these modes are placed at the right of scene area on the top of main screen and set the modes of external MIDI keyboards.
"Mv: ..." - This button enables or disables use the velocity for MIDI keyboards. By default use of velocity for MIDI keyboards is define in the panel "Keyboard settings" - "Keyboards" and stores for each scene. This button can enable or disable to use velocity regardless scene parameters and its state do not be reset when scene change.
Mode "Mv:on" defines that the velocity is always enable. Mode "Mv:off" defines that the velocity is always disable. Mode "Mv:sce" defines that use of the velocity defined by the scene.
The green marker indicates that the use of velocity is enable by this button or in the scene (in the "Keyboard settings" - "Keyboards"). The red marker indicates that use of the velocity is disable.
"Mc: ..." - This button defines the curve of velocity for MIDI keyboards. There are two modes - "Linear" marked by letter "l" and "Soft" marked by letter "s". Next number indicates mode of expanding range of velocity. The number "0" indicates no expand. Try different modes with your keyboard for more convenient use of velocity.
"Mw: ..." - This button sets the mode of use the modulation wheel on MIDI keyboards. By default the modulation wheel assigned to change Effect 1. The Effect parameters have central position "0%" and two extreme positions "-100%" and "+100%". So the modulation wheel on the keyboard should have free move to remain in last position. But if your keyboard has modulation wheel that always returned to zero position when released you can use this button to set the mode when the modulation wheel will changing the parameters from "0%" to "+100%" or from "0%" to "-100%". Mode "Mw:c" defines that the modulation wheel will changing the parameters from center position "0%" to "+100%" or "-100%" (default mode).
Mode "Mw:+" sets changing from "0%" to "+100%". Mode "Mw:-" sets changing from "0%" to "-100%". You can use these modes with any type of the modulation wheel especially if you set the initial value of Effect other than central position.
Also in this update:
- Sequencer evenly placing steps in oscillator voices.
- Markers of actual values for Effects 1,2 on main screen.
- Quick switch between oscillator control panels.
- Added control for MIDI keyboard velocity mode.
- Added control for MIDI keyboard velocity curve.
- Added control for MIDI keyboard modulation wheel.
- Modulation wheel on MIDI keyboard supports defaultly.
- MIDI keyboard velocity is sent to each voice.
- Changing font size in description panel.
- Built-in description updated.
- Several minor bugs were fixed.
Guides and demos:
[ SynthScaper - Wide and deep sound with the single preset (guide with pictures) ]
[ SynthScaper - Natural chorus and Spatial effects (guide with pictures) ]
[ SynthScaper - How to assign "LFO" to parameters (guide with pictures) ]
[ SynthScaper - How to use "Effect" parameters (guide with pictures) ]
[ SynthScaper - Two-Voiced Drone (guide with pictures) ]
[ SynthScaper - Start with your own samples (guide with pictures) ]
[ SynthScaper - The Designer tool (short description) ]
[ SynthScaper - Arpeggiator / Sequencer overview (video demo) ]
[ SynthScaper - Automate pitch shifting (video demo) ]
[ SynthScaper - One shot sample demo (video demo) ]
[ SynthScaper modules connection diagram (big picture) ]
[ Complete description of SynthScaper 1.6 in one PDF file ]

Tuesday, August 28, 2018
SynthScaper - Natural chorus and Spatial effects
SynthScaper has excellent possibilities to create spatial effects from plain or mono samples. This app has several ways for auto moving voices over the panorama as well as effects that have stereo imaging functions.
SynthScaper - Soundscapes synthesizer specially designed for creating and experiments with ambient soundscapes in wide range from noises to melodic instruments and everything in between.
This example shows how to create a complete instrument with bright and continuously changing spatial sound from the one mono sample.
Also in this example will be used a very interesting feature "Natural chorus" which can automatically pan several voices (each oscillator in Synthscaper has six voices) when they appear and disappear.
1. Set "Empty scene"
The best way to start creating a new instrument is to use the initial settings of all parameters to make the oscillator work in simple mode, and no any settings affect it. The special scene "Empty scene" sets the initial values of all parameters. In this scene oscillators 1 and 3 are muted, and for oscillator 2 is used only first layer with sine waveform. Filters, Envelopes and LFOs are not assigned (except for the base Envelope generator for the "Level" parameter).
From the list of scenes select "Empty scene" to set all parameters to initial values.
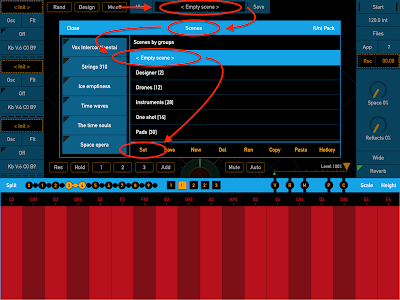
- On the main screen tap on area at the top with name of current scene.
- From the main list of scenes select "Empty scene". If the list is show content one of scenes group, tap the button "Back" above the list to go to the main list.
- Tap the button "Set" below to set the empty scene.
- Close the list by button "Close".
2. Select sample
You need set the same sample for all three layers.
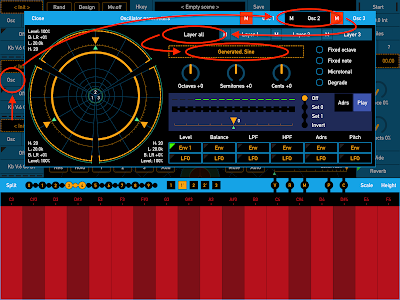
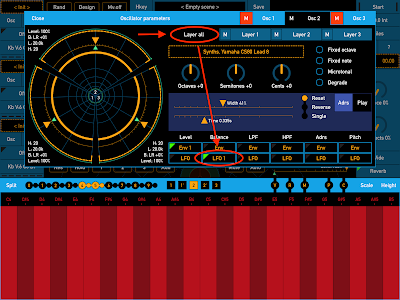
- On the main screen, tap button "Osc" on the left panel in the area of oscillator 2 (in the middle of the left panel) to open the panel "Oscillator parameters".
- Tap the button "Layer all" to select a mode in which changing any parameter will apply to all layers (but only when you change parameter). Also in this mode the selected sample will be assigned to all layers.
- Tap the dashed area below to open the panel "Samples library" where you can select and set the sample for the current oscillator and all layers (or the current layer if you select specific layer).
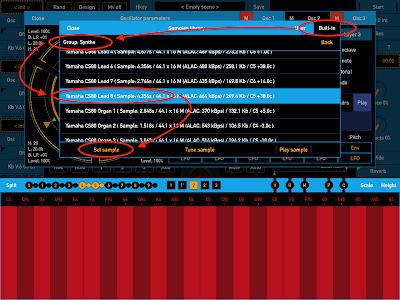
- In the panel "Samples library" you need select the sample from built-in library. At the title of panel tap the button "Built-in" to switch on the list of built-in library. If you need select the sample downloaded to this app use the button "User" to switching to the user library.
- Select the sample that will have bright and noticeable sound when it uses in the multi-layered instrument. For this example select the sample "Yamaha CS80 Lead 8" from the group "Synths". If you want to select another group tap the button "Back" at the top right to go to the main list. In the main list you can select another group.
- Tap the button "Set sample" to set the selected sample for all layers of oscillator 2.
When you finish creating a new instrument with this example, you can try to select other samples and listen to their sound with the same settings.
3. Shift tone for the layers
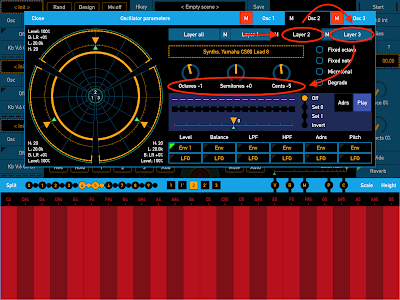
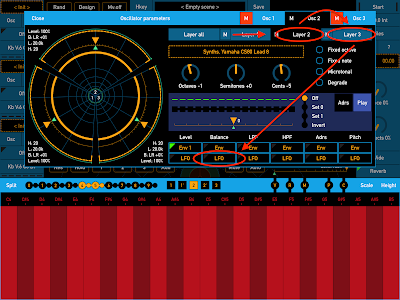
One of the easiest ways to make the sound of a single sample brighter is to shift the tone for different layers. For example you can shift the one octave up and one octave down for layers 2 and 3. Layer 1 remains not shifted. Also you can shift the cents from "3" to "7" (or even more), up or down for these layers. It gives more harmonics and more interesting sound.
- In the panel "Oscillator parameters" tap the button "Layer 2" and set value of the knob "Octave" to "-1". Also set "Cents" to "-5". For the "Layer 3" set "Octave" to "+1" and "Cents" to "+7".
Try playing some notes or chords and listen to the result. Try to set another value of shift "Cents" for different layers.
4. Add "Natural chorus" effect
In the next step we will add the first spatial effect "Natural chorus". This effect will change the panorama of voices (i.e. move voices left or right) when the voice appears and disappears.
First voice (when you press single key) appears on center. The next voices (when you press and hold down several keys) will move already sounding voices farther from the center to left and right, and new voice will placed to the center. When you release the keys the voices will move closer to the center.
The parameter "Width" defines the maximum value of panorama for all voices. Value "100%" means that all 6 voices will placed between "100% left" to "100% right".
The parameter "Time" defines the time for which the voices reach their final positions. The more this value, the more smoothly the voices will move when you press or release the keys.
For this example we will set the same value of parameters "Width" and "Time" for all layers. But you can try set the different values for different layers. For example set less value of "Width" for low tones and higher value for high tones. You will get even more complex spatial effect. Or come up with any other options.
- In the panel "Oscillator parameters" tap the button "Layer all" and tap the button "Play" in the center area. Set value of "Width" about to "35%" and "Time" about to "0.3s".
Try to press and hold several keys one by one slowly. Listen to the result. It is best to use headphones.
5. Assign Envelope generator (ADSR) to level
The envelope generator (or ADSR) assigned to the parameter "Level" greatly influences to the character of the oscillator sound. By default in empty scene the envelope generator 1 with default settings already assigned to the parameter "Level" for all layers.
- In the panel "Oscillator parameters" select "Layer all" and tap the button "Env" below title "Level".
- In the panel "Envelope parameters" make sure that the envelope generator 1 is selected and assigned to parameter "Level" for all layers. The button "Assign" has green marks and title above parameter knob should indicate that it is parameter "Level", for all layers ("La") of oscillator 2 ("O2").
- Tap the button "Default" several times to select one of default envelopes.
- Set values of the knobs "Attack" to about "0.45s", "Decay" - "0.16s", "Sustain" - "88%", "Release" - "1.77s".
You can change the envelope for the parameter "Level" to make the sound smoother or sharper. Use a longer attack time and longer release time to build beautiful pads. Or set the attack and release time to small values to get a staccato sound.
6. Assign Low-frequency oscillator (LFO) to balance
Another interesting spatial effect can be reached by assign LFO to the parameter "Balance". Unlike the effect "Natural chorus" which change panorama (or "Balance") for voices, this method will change panorama for layers and can be very noticeable when you use different samples for different layers. But even with the same sample for all layers this effect will give additional variations to the sound. You can combine both of these effects or use only one.
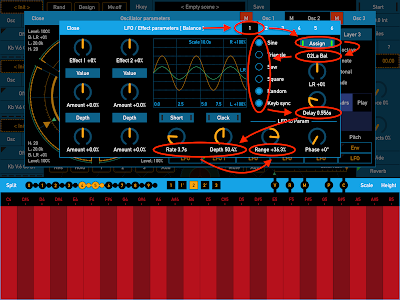
- In the panel "Oscillator parameters" select "Layer all" and tap the button "LFO" below title "Balance".
- In the panel "LFO / Effect parameters" make sure that the low-frequency oscillator 1 is selected and assigned to parameter "Balance" for all layers. The button "Assign" has green marks and title above parameter knob should indicate that it is parameter "Balance" for all layers ("La") of oscillator 2 ("O2").
- Set the modes of LFO - "Sine" waveform, "Random" mode and "Keyboard sync".
- Set value of the knob "Delay" to about "0.55s". This knob has effect only when you set the mode "Keyboard sync". This parameter will delay starts of LFO on specified time when the first key is pressed.
- Set value of the knob "Rate" to about "3.7s" and the knob "Depth" to about "50%". These parameters define work of whole LFO. But you can specified in which range this LFO will changing the destination parameter.
- Set value of the knob "Range" to about "36%". This parameter defines in which range LFO will changing the destination parameter "Balance". Two graphs on this panel show changing LFO waveform (brown) and changing of destination parameter (green).
For more advanced effect set the parameter "Phase shift" in LFO for different layers. You can use this trick not only for changing parameter "Balance" but also in any other cases when you assign the same LFO for all layers or for different parameters.
- In the panel "Oscillator parameters" tap the button "Layer 2" and then tap the button "LFO" below the title "Balance". After you set parameters of LFO for layer 2, tap the button "Layer 3" and set LFO parameters for this layer.
- In the panel "LFO / Effect parameters" make sure that LFO 1 is selected and assigned to parameter "Balance" for layer 2. The button "Assign" has green marks and title of the knob below this button should indicate that it is parameter "Balance" for layer 2 ("L2") of oscillator 2 ("O2"). It is the same parameter that on "Oscillator parameters" panel.
- Set value of the knob "Phase" to about "+18" for layer 2. Then for layer 3 set this value about "+47". In result the parameter "Balance" for all layers will varying with the same rate and depth but will have differ value for each layer due to phase shift. This trick adds very interesting spatial variations.
7. Add Low-pass filter
A low-pass filter (LPF) removes high frequencies from a tone. It makes the tone sound more mellow or muted. The parameter "Frequency" defines cutoff frequency. The lower the parameter "Frequency", the more muted the tone sounds. The parameter "Resonance" boosts the overtones near the cutoff frequency. The parameter "Saturate" adds more harmonics to the signal.
The best way is to make this filter controlled by the vertical slide on screen keyboard or by modulation wheel on MIDI controller. Or make continuously changing it with using LFO. Or both of these ways. In this example we will assign LFO for this filter.
- On the main screen, tap button "Flt" on the left panel in the area of oscillator 2 (in the middle of the left panel) to open the panel "Filter parameters".
- Tap the dashed area of first slot (the most left) to open the list of filters and effects. In this list select "Low-pass ladder 24 db", then tap the button "Set" to set this filter for the first slot.
- Tap the button "M" at the top right of the first slot to unmute this slot.
- Set values of parameters "Saturate" to about "43%", "Frequency" about "6 kHz" and "Resonance" about "49%".
8. Assign LFO to LPF
In this example LFO will constantly change the parameter "Frequency" of low-pass filter. You should to use LFO 2 because LFO 1 already used for changing the oscillator parameter "Balance".
- In the panel of "Filter parameters" make sure that the layer 2 is selected and the first slot has the filter "Low-pass ladder 24 db".
- Tap the button "LFO" below the first parameter of filter. When you first time will set this filter no any LFO not assigned on it.
- In the panel "LFO / Effect parameters" select LFO 2, then tap the button "Assign" to assign this LFO to the first parameter of filter. This button will have green marks and LFO number will be indicated in the button title on "Filter parameters" panel.
- The knob below the button "Assign" will have the title indicates that LFO was assigned for the first parameter ("Frequency") for filter 1 ("L2") of oscillator 2 ("O2"). It is the same parameter that on "Filter parameters" panel.
- Set the modes of LFO - "Sine" waveform and "Keyboard sync". Parameter "Keyboard sync" will sync starts of LFO when the first key is pressed.
- Set value of the knob "Rate" to about "5.2s" and knob "Depth" to about "37%". These parameters define work of whole LFO. But you can specified in which range this LFO will changing the destination parameter.
- Set value of the knob "Range" to about "36%". This parameter defines in which range LFO will changing the destination parameter "Frequency". Two graphs on this panel show changing LFO waveform (brown) and changing of destination parameter (green).
9. Add Chorus effect
The effect "Chorus" can make any sound rich, lush and coloring. If you use mono sample and don't use any spatial effects with oscillator this effect can add stereo width to the oscillator sound. But even with use spatial effects in oscillator the effect "Chorus" will fit great.
The parameter "Amount" defines the ratio between the original signal and the signal after "Chorus" effect. The parameter "Intensity" defines level of variations in this effect. The parameter "Width" defines stereo width of this effect.
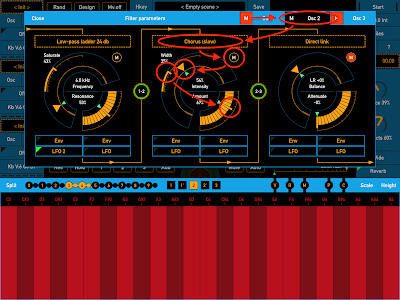
- In the panel of "Filter parameters" make sure that the layer 2 is selected, and then tap to the dashed area of second slot (in the middle) to open the list of filters and effects. In this list select "Chorus (slow)", then tap the button "Set" to set this effect for the second slot.
- Tap the button "M" at the top right of the second slot to unmute this slot.
- Set values of parameters "Intensity" to about "54%", "Width" about "35%" and "Amount" about "67%".
You can try to replace this effect to "Chorus (fast)" and choose the one that seems more fit for you.
10. Add reverb
Finally complete your scene with a reverb.
- On the main screen make sure that reverb / spatial mixer is on. The button "Reverb" at the bottom right has green mark.
- Set value of the knob "Reflects" to about "33%" and knob "Space" about "63%".
- Move the ring control of oscillator 2 (control with number 2 at the center) slightly down.
You can turn off the reverb / spatial mixer. In this case when you move oscillator control on the spatial mixer area it will just change output level (close - far) and panorama (left - right).
When the reverb is turned on the position of ring control defines the position of sound source (oscillator output) in the sound space. The bottom center point of the spatial mixer closest to the listener. Moving the control element further from the bottom center point distances sound of oscillator away from the listener. Moving the control element to the left or right moves the sound in space also to the left or right, but taking into account the distance to it.
The parameter "Space" defines relative size of reverb space. The parameter "Reflects" defines amount of reflections from the boundaries of the reverb space.
The SynthScaper is just created for various experiments with sound. Feel free to try new ways of configure this app and you will be able to get a more interesting result than with any other synths.
See also:
[ SynthScaper - Wide and deep sound with the single preset (guide with pictures) ]
[ SynthScaper - Natural chorus and Spatial effects (guide with pictures) ]
[ SynthScaper - How to assign "LFO" to parameters (guide with pictures) ]
[ SynthScaper - How to use "Effect" parameters (guide with pictures) ]
[ SynthScaper - Two-Voiced Drone (guide with pictures) ]
[ SynthScaper - Start with your own samples (guide with pictures) ]
[ SynthScaper - The Designer tool (short description) ]
[ SynthScaper - Arpeggiator / Sequencer overview (video demo) ]
[ SynthScaper - Automate pitch shifting (video demo) ]
[ SynthScaper - One shot sample demo (video demo) ]
[ SynthScaper modules connection diagram (big picture) ]
[ Complete description of SynthScaper 1.6 in one PDF file ]

SynthScaper - Soundscapes synthesizer specially designed for creating and experiments with ambient soundscapes in wide range from noises to melodic instruments and everything in between.
This example shows how to create a complete instrument with bright and continuously changing spatial sound from the one mono sample.
Also in this example will be used a very interesting feature "Natural chorus" which can automatically pan several voices (each oscillator in Synthscaper has six voices) when they appear and disappear.
1. Set "Empty scene"
The best way to start creating a new instrument is to use the initial settings of all parameters to make the oscillator work in simple mode, and no any settings affect it. The special scene "Empty scene" sets the initial values of all parameters. In this scene oscillators 1 and 3 are muted, and for oscillator 2 is used only first layer with sine waveform. Filters, Envelopes and LFOs are not assigned (except for the base Envelope generator for the "Level" parameter).
From the list of scenes select "Empty scene" to set all parameters to initial values.
You can click on any image to enlarge it
- On the main screen tap on area at the top with name of current scene.
- From the main list of scenes select "Empty scene". If the list is show content one of scenes group, tap the button "Back" above the list to go to the main list.
- Tap the button "Set" below to set the empty scene.
- Close the list by button "Close".
2. Select sample
You need set the same sample for all three layers.
- On the main screen, tap button "Osc" on the left panel in the area of oscillator 2 (in the middle of the left panel) to open the panel "Oscillator parameters".
- Tap the button "Layer all" to select a mode in which changing any parameter will apply to all layers (but only when you change parameter). Also in this mode the selected sample will be assigned to all layers.
- Tap the dashed area below to open the panel "Samples library" where you can select and set the sample for the current oscillator and all layers (or the current layer if you select specific layer).
- In the panel "Samples library" you need select the sample from built-in library. At the title of panel tap the button "Built-in" to switch on the list of built-in library. If you need select the sample downloaded to this app use the button "User" to switching to the user library.
- Select the sample that will have bright and noticeable sound when it uses in the multi-layered instrument. For this example select the sample "Yamaha CS80 Lead 8" from the group "Synths". If you want to select another group tap the button "Back" at the top right to go to the main list. In the main list you can select another group.
- Tap the button "Set sample" to set the selected sample for all layers of oscillator 2.
When you finish creating a new instrument with this example, you can try to select other samples and listen to their sound with the same settings.
3. Shift tone for the layers
One of the easiest ways to make the sound of a single sample brighter is to shift the tone for different layers. For example you can shift the one octave up and one octave down for layers 2 and 3. Layer 1 remains not shifted. Also you can shift the cents from "3" to "7" (or even more), up or down for these layers. It gives more harmonics and more interesting sound.
- In the panel "Oscillator parameters" tap the button "Layer 2" and set value of the knob "Octave" to "-1". Also set "Cents" to "-5". For the "Layer 3" set "Octave" to "+1" and "Cents" to "+7".
Try playing some notes or chords and listen to the result. Try to set another value of shift "Cents" for different layers.
4. Add "Natural chorus" effect
In the next step we will add the first spatial effect "Natural chorus". This effect will change the panorama of voices (i.e. move voices left or right) when the voice appears and disappears.
First voice (when you press single key) appears on center. The next voices (when you press and hold down several keys) will move already sounding voices farther from the center to left and right, and new voice will placed to the center. When you release the keys the voices will move closer to the center.
The parameter "Width" defines the maximum value of panorama for all voices. Value "100%" means that all 6 voices will placed between "100% left" to "100% right".
The parameter "Time" defines the time for which the voices reach their final positions. The more this value, the more smoothly the voices will move when you press or release the keys.
For this example we will set the same value of parameters "Width" and "Time" for all layers. But you can try set the different values for different layers. For example set less value of "Width" for low tones and higher value for high tones. You will get even more complex spatial effect. Or come up with any other options.
- In the panel "Oscillator parameters" tap the button "Layer all" and tap the button "Play" in the center area. Set value of "Width" about to "35%" and "Time" about to "0.3s".
Try to press and hold several keys one by one slowly. Listen to the result. It is best to use headphones.
5. Assign Envelope generator (ADSR) to level
The envelope generator (or ADSR) assigned to the parameter "Level" greatly influences to the character of the oscillator sound. By default in empty scene the envelope generator 1 with default settings already assigned to the parameter "Level" for all layers.
- In the panel "Oscillator parameters" select "Layer all" and tap the button "Env" below title "Level".
- In the panel "Envelope parameters" make sure that the envelope generator 1 is selected and assigned to parameter "Level" for all layers. The button "Assign" has green marks and title above parameter knob should indicate that it is parameter "Level", for all layers ("La") of oscillator 2 ("O2").
- Tap the button "Default" several times to select one of default envelopes.
- Set values of the knobs "Attack" to about "0.45s", "Decay" - "0.16s", "Sustain" - "88%", "Release" - "1.77s".
You can change the envelope for the parameter "Level" to make the sound smoother or sharper. Use a longer attack time and longer release time to build beautiful pads. Or set the attack and release time to small values to get a staccato sound.
Another interesting spatial effect can be reached by assign LFO to the parameter "Balance". Unlike the effect "Natural chorus" which change panorama (or "Balance") for voices, this method will change panorama for layers and can be very noticeable when you use different samples for different layers. But even with the same sample for all layers this effect will give additional variations to the sound. You can combine both of these effects or use only one.
- In the panel "Oscillator parameters" select "Layer all" and tap the button "LFO" below title "Balance".
- In the panel "LFO / Effect parameters" make sure that the low-frequency oscillator 1 is selected and assigned to parameter "Balance" for all layers. The button "Assign" has green marks and title above parameter knob should indicate that it is parameter "Balance" for all layers ("La") of oscillator 2 ("O2").
- Set the modes of LFO - "Sine" waveform, "Random" mode and "Keyboard sync".
- Set value of the knob "Delay" to about "0.55s". This knob has effect only when you set the mode "Keyboard sync". This parameter will delay starts of LFO on specified time when the first key is pressed.
- Set value of the knob "Rate" to about "3.7s" and the knob "Depth" to about "50%". These parameters define work of whole LFO. But you can specified in which range this LFO will changing the destination parameter.
- Set value of the knob "Range" to about "36%". This parameter defines in which range LFO will changing the destination parameter "Balance". Two graphs on this panel show changing LFO waveform (brown) and changing of destination parameter (green).
For more advanced effect set the parameter "Phase shift" in LFO for different layers. You can use this trick not only for changing parameter "Balance" but also in any other cases when you assign the same LFO for all layers or for different parameters.
- In the panel "Oscillator parameters" tap the button "Layer 2" and then tap the button "LFO" below the title "Balance". After you set parameters of LFO for layer 2, tap the button "Layer 3" and set LFO parameters for this layer.
- In the panel "LFO / Effect parameters" make sure that LFO 1 is selected and assigned to parameter "Balance" for layer 2. The button "Assign" has green marks and title of the knob below this button should indicate that it is parameter "Balance" for layer 2 ("L2") of oscillator 2 ("O2"). It is the same parameter that on "Oscillator parameters" panel.
- Set value of the knob "Phase" to about "+18" for layer 2. Then for layer 3 set this value about "+47". In result the parameter "Balance" for all layers will varying with the same rate and depth but will have differ value for each layer due to phase shift. This trick adds very interesting spatial variations.
7. Add Low-pass filter
A low-pass filter (LPF) removes high frequencies from a tone. It makes the tone sound more mellow or muted. The parameter "Frequency" defines cutoff frequency. The lower the parameter "Frequency", the more muted the tone sounds. The parameter "Resonance" boosts the overtones near the cutoff frequency. The parameter "Saturate" adds more harmonics to the signal.
The best way is to make this filter controlled by the vertical slide on screen keyboard or by modulation wheel on MIDI controller. Or make continuously changing it with using LFO. Or both of these ways. In this example we will assign LFO for this filter.
- On the main screen, tap button "Flt" on the left panel in the area of oscillator 2 (in the middle of the left panel) to open the panel "Filter parameters".
- Tap the dashed area of first slot (the most left) to open the list of filters and effects. In this list select "Low-pass ladder 24 db", then tap the button "Set" to set this filter for the first slot.
- Tap the button "M" at the top right of the first slot to unmute this slot.
- Set values of parameters "Saturate" to about "43%", "Frequency" about "6 kHz" and "Resonance" about "49%".
8. Assign LFO to LPF
In this example LFO will constantly change the parameter "Frequency" of low-pass filter. You should to use LFO 2 because LFO 1 already used for changing the oscillator parameter "Balance".
- In the panel of "Filter parameters" make sure that the layer 2 is selected and the first slot has the filter "Low-pass ladder 24 db".
- Tap the button "LFO" below the first parameter of filter. When you first time will set this filter no any LFO not assigned on it.
- In the panel "LFO / Effect parameters" select LFO 2, then tap the button "Assign" to assign this LFO to the first parameter of filter. This button will have green marks and LFO number will be indicated in the button title on "Filter parameters" panel.
- The knob below the button "Assign" will have the title indicates that LFO was assigned for the first parameter ("Frequency") for filter 1 ("L2") of oscillator 2 ("O2"). It is the same parameter that on "Filter parameters" panel.
- Set the modes of LFO - "Sine" waveform and "Keyboard sync". Parameter "Keyboard sync" will sync starts of LFO when the first key is pressed.
- Set value of the knob "Rate" to about "5.2s" and knob "Depth" to about "37%". These parameters define work of whole LFO. But you can specified in which range this LFO will changing the destination parameter.
- Set value of the knob "Range" to about "36%". This parameter defines in which range LFO will changing the destination parameter "Frequency". Two graphs on this panel show changing LFO waveform (brown) and changing of destination parameter (green).
9. Add Chorus effect
The effect "Chorus" can make any sound rich, lush and coloring. If you use mono sample and don't use any spatial effects with oscillator this effect can add stereo width to the oscillator sound. But even with use spatial effects in oscillator the effect "Chorus" will fit great.
The parameter "Amount" defines the ratio between the original signal and the signal after "Chorus" effect. The parameter "Intensity" defines level of variations in this effect. The parameter "Width" defines stereo width of this effect.
- In the panel of "Filter parameters" make sure that the layer 2 is selected, and then tap to the dashed area of second slot (in the middle) to open the list of filters and effects. In this list select "Chorus (slow)", then tap the button "Set" to set this effect for the second slot.
- Tap the button "M" at the top right of the second slot to unmute this slot.
- Set values of parameters "Intensity" to about "54%", "Width" about "35%" and "Amount" about "67%".
You can try to replace this effect to "Chorus (fast)" and choose the one that seems more fit for you.
Finally complete your scene with a reverb.
- On the main screen make sure that reverb / spatial mixer is on. The button "Reverb" at the bottom right has green mark.
- Set value of the knob "Reflects" to about "33%" and knob "Space" about "63%".
- Move the ring control of oscillator 2 (control with number 2 at the center) slightly down.
You can turn off the reverb / spatial mixer. In this case when you move oscillator control on the spatial mixer area it will just change output level (close - far) and panorama (left - right).
When the reverb is turned on the position of ring control defines the position of sound source (oscillator output) in the sound space. The bottom center point of the spatial mixer closest to the listener. Moving the control element further from the bottom center point distances sound of oscillator away from the listener. Moving the control element to the left or right moves the sound in space also to the left or right, but taking into account the distance to it.
The parameter "Space" defines relative size of reverb space. The parameter "Reflects" defines amount of reflections from the boundaries of the reverb space.
The SynthScaper is just created for various experiments with sound. Feel free to try new ways of configure this app and you will be able to get a more interesting result than with any other synths.
See also:
[ SynthScaper - Wide and deep sound with the single preset (guide with pictures) ]
[ SynthScaper - Natural chorus and Spatial effects (guide with pictures) ]
[ SynthScaper - How to assign "LFO" to parameters (guide with pictures) ]
[ SynthScaper - How to use "Effect" parameters (guide with pictures) ]
[ SynthScaper - Two-Voiced Drone (guide with pictures) ]
[ SynthScaper - Start with your own samples (guide with pictures) ]
[ SynthScaper - The Designer tool (short description) ]
[ SynthScaper - Arpeggiator / Sequencer overview (video demo) ]
[ SynthScaper - Automate pitch shifting (video demo) ]
[ SynthScaper - One shot sample demo (video demo) ]
[ SynthScaper modules connection diagram (big picture) ]
[ Complete description of SynthScaper 1.6 in one PDF file ]

Tuesday, August 21, 2018
SynthScaper ver. 1.5 has been released
SynthScaper - Soundscapes synthesizer for iPad and iPhone ver. 1.5 has been released.
Synthesizer specially designed for creating and experiments with ambient soundscapes in wide range from noises to melodic instruments and everything in between.
The sound engine of SynthScaper has its own unique sounding differ from any other software synths. You can construct outstanding melodic pads or atonal soundscapes from different kind of built-in or downloaded samples by using all power of multi-layered oscillators, chains of filters and effects, envelope generators and low frequency oscillators. Or you can create your own sound scenes combining oscillators presets from build-in library. Or just use predefined scenes.
>>> More details about SynthScaper
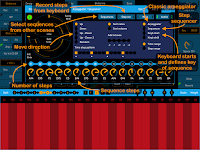
In this update added an advanced arpeggiator / sequencer for each oscillator with modes where the keyboard can start the sequence and shift it depending on the key. Also, you can record sequence steps using screen or MIDI keyboard or select sequences from other scenes. The start and tempo of the sequence can be synchronized with Ableton Link, Inter-App audio or with external MIDI devices.
New features:
Also in this update:
Useful information about SynthScaper app:
[ SynthScaper - How to assign "LFO" to parameters (guide with pictures) ]
[ SynthScaper - How to use "Effect" parameters (guide with pictures) ]
[ SynthScaper - Two-Voiced Drone (guide with pictures) ]
[ SynthScaper - Start with your own samples (guide with pictures) ]
[ SynthScaper - The Designer tool (short description) ]
[ SynthScaper - Automate pitch shifting (video demo) ]
[ SynthScaper - One shot sample demo (video demo) ]
[ SynthScaper modules connection diagram (big picture) ]
[ Complete description of SynthScaper 1.5 in one PDF file ]
SynthScaper Tutorial:

Synthesizer specially designed for creating and experiments with ambient soundscapes in wide range from noises to melodic instruments and everything in between.
The sound engine of SynthScaper has its own unique sounding differ from any other software synths. You can construct outstanding melodic pads or atonal soundscapes from different kind of built-in or downloaded samples by using all power of multi-layered oscillators, chains of filters and effects, envelope generators and low frequency oscillators. Or you can create your own sound scenes combining oscillators presets from build-in library. Or just use predefined scenes.
>>> More details about SynthScaper
In this update added an advanced arpeggiator / sequencer for each oscillator with modes where the keyboard can start the sequence and shift it depending on the key. Also, you can record sequence steps using screen or MIDI keyboard or select sequences from other scenes. The start and tempo of the sequence can be synchronized with Ableton Link, Inter-App audio or with external MIDI devices.
New features:
Click on image to enlarge.
Also in this update:
- Own sequencer / arpeggiator for each oscillator.
- Sync with Ableton Link, Inter-App audio and MIDI.
- Select sequences from other scenes (if they defined).
- Record sequence from virtual or MIDI keyboards.
- Mode when keyboard starts and shifts sequence.
- Mode "All" to set params for all sequencers at once.
- Button "Rand" on main screen generate new scene.
- Access files thru iOS 11 Files app.
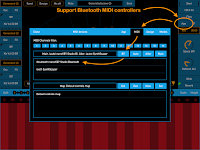
- Support bluetooth MIDI controllers.
- Built-in description updated.
- Several minor bugs were fixed.
Useful information about SynthScaper app:
[ SynthScaper - How to assign "LFO" to parameters (guide with pictures) ]
[ SynthScaper - How to use "Effect" parameters (guide with pictures) ]
[ SynthScaper - Two-Voiced Drone (guide with pictures) ]
[ SynthScaper - Start with your own samples (guide with pictures) ]
[ SynthScaper - The Designer tool (short description) ]
[ SynthScaper - Automate pitch shifting (video demo) ]
[ SynthScaper - One shot sample demo (video demo) ]
[ SynthScaper modules connection diagram (big picture) ]
[ Complete description of SynthScaper 1.5 in one PDF file ]
SynthScaper Tutorial:

Saturday, August 4, 2018
SynthScaper Tutorial
Great and very detailed review and tutorial of SynthScaper - Soundscapes synthesizer
Synthesizer specially designed for creating and experiments with ambient soundscapes in wide range from noises to melodic instruments and everything in between.
The sound engine of SynthScaper has its own unique sounding differ from any other software synths. You can construct outstanding melodic pads or atonal soundscapes from different kind of built-in or downloaded samples by using all power of multi-layered oscillators, chains of filters and effects, envelope generators and low frequency oscillators. Or you can create your own sound scenes combining oscillators presets from build-in library. Or just use predefined scenes.
>>> More details about SynthScaper
Also you maybe interested in:
The most comprehensive tutorial for FieldScaper - Field recorder & Scapes constructor
FieldScaper is an advanced field recorder combined with a sound warp engine and a collection of ready to use dynamic presets for iPad and iPhone. Discover new ways to create and construct unusual and exciting sounds from any environmental audio recordings or samples recorded from other apps through Inter-App audio or Audiobus.
The main advantage is that you can record and modify samples along the way within the single app. You can record sounds and noises, delete unwanted parts and then use presets to give a whole new sounding or create spectacular soundscapes and textures to use them as loops in this app. And even use FieldScaper as effect in real time with other apps or external input.
>>> More details about FieldScaper
Wednesday, August 1, 2018
Limited Time SALE! All apps!
*Scaper series apps - SynthScaper / FieldScaper / SoundScaper
SynthScaper - Synthesizer for iPad and iPhone specially designed for creating and experiments with ambient soundscapes in wide range from noises to melodic instruments and everything in between. Buy on App Store >>>
SynthScaper nominated for "The Best new iOS app of 2017" by MusicRadar
SynthScaper nominated for "The TabMuse Top iOS Music Apps of 2017"
FieldScaper - Advanced field recorder combined with a sound warp engine and a collection of ready to use dynamic presets for iPad and iPhone. Discover new ways to create and construct unusual and exciting sounds from any environmental audio recordings or samples recorded from other apps through Inter-App audio or Audiobus. Buy on App Store >>>
SoundScaper - An experimental sound mini lab for creating unusual soundscapes, atmospheric textures, drones, glitches and noises based on circuit bending principles. Buy on App Store >>>
Audio Mastering series
Audio Mastering - The first fully functional audio mastering application with professional quality delivers an unprecedented level of clarity, punch and warmth to your mix. Buy on App Store >>>
AltiSpace - Convolution Reverb. The realistic sound of famous reverb gears for your iPad and iPhone! Buy on App Store >>>
Master FX - Multipurpose effect processor for guitar, synthesizer and voice, providing a wide range of high-quality and creative effects options for audio processing. Buy on App Store >>>
Master Record - Tape simulation recorder, player and effect for Inter-App Audio and Audiobus. Buy on App Store >>>
Monday, July 30, 2018
SynthScaper - How to assign "LFO" to parameters
SynthScaper has three independent multi-layered oscillators and each of them has six LFO (low-frequency oscillator) which can be assigned to automatically change parameters of oscillators or filters.
SynthScaper - Soundscapes synthesizer specially designed for creating and experiments with ambient soundscapes in wide range from noises to melodic instruments and everything in between.
The best way to start learning the work of LFO is to use the initial settings of all parameters so that the oscillator works in simple mode and no any settings affect to it. The special scene "Empty scene" set the initial values of all parameters. In this scene oscillators 1 and 3 are muted and for oscillator 2 is used only first layer with sine waveform. Filters, Envelopes and LFOs are not assigned (excluding base Envelope generator for parameter "Level").
If you are sure that you only need to know how to assign LFO to the parameters you can skip next step.
1. Set "Empty scene"
From the list of scenes select "Empty scene" to set all parameters to initial values.
- On the main screen tap on area at the top with name of current scene.
- From the main list of scenes select "Empty scene". If the list is show content one of scenes group, tap the button "Back" above the list to go to the main list.
- Tap the button "Set" below to set the empty scene.
- Close the list by button "Close".
2. Select sample
Any LFO can be assigned to the oscillator parameters on the panel "Oscillator parameters" or assigned to filters parameters on the panel "Filter parameters".
- On the main screen tap button "Osc" on the left panel in area of oscillator 2 (in the middle of left panel).
- For this example will be used only layer 1. Tap button "Layer 1" to select this layer. All parameters in this panel below layers buttons will be applied only to the selected layer.
- If you select "Layer all" the value of each parameters below will be applied to all three layers, but only when you will change it.
- Tap the dashed area below to open the panel "Samples library" where you can select and set the sample for the current oscillator and current layer.
- In the "Samples library" you need to select the sample from built-in library. At the title of panel tap the button "Built-in" to switch on the list of built-in library. If you need to select the sample uploaded to this app use the button "User" to switch on the user library.
- Select the sample that differ from sine wave for more noticeable result. For example select the sample "Saw down" from the group "Generated".
- Tap the button "Set sample" to set the selected sample for oscillator 2 and layer 1.
3. Assign LFO
One of six LFOs available for each oscillator can be assigned to the parameters indicated at the bottom of panel. Below the title of each parameter there are buttons "Env" for assign envelope generator (ADSR) and LFO for assign low-frequency oscillator to this parameter. When LFO or Envelope are assigned to the parameter the button has green mark at the left corner and number of assigned LFO or Envelope generator will show.
- You can assign the same or different LFOs to each parameter of each layer. If you need assign the same LFO for the all layers select "Layer all" at the top of panel then assign LFO.
- Tap the button "LFO" below title "Level" to open LFO control panel.
- In the title of LFO control panel there are 6 buttons to select one of LFOs. Select LFO 1.
- Tap the button "Assign" to assign LFO 1 to the parameter "Level". When you close this panel the button below parameter "Level" will have green mark and title "LFO 1".
- Below button "Assign" there is knob which change value of parameter that you selected to assign LFO (ie value of "Level" in this example). This is the same value which you can set in oscillator control panel. Slightly decrease this value so that LFO can varying this parameter.
- Use knob "Range" to set the range in which LFO will varying this parameter. Each LFO has parameter "Depth" which set the level of variations of this LFO. Since the same LFO can be assigned for several parameters so you should use knob "Range" to set individual level of variations for each assigned parameters.
- Use button "Short" to set short range of rates for this LFO. Then set some rate by knob "Rate".
- Set the depth of LFO variations by knob "Depth". You will see the changing of LFO graph (brown) and changing graph of parameter "Level" (green). If you change the knob "Range" only graph of the parameter variations will changing.
The value of each parameter on which LFO can be assigned you can set not only in LFO control panel but also in the panel "Oscillator parameters" on the ring control at the left on that panel (excluding parameter "Pitch").
Also on this control green marks indicate actual value of parameter. Actual value will differ from base value which you set when this parameter will changing by LFO, Envelope generator (ADSR) or when controls Effect 1 / 2 will be assigned to this parameter.
Each oscillator has three slot for filters / effects. You can select filters and effects in the panel "Filter parameters". On the main screen tap button "Flt" next from button "Osc" on the left panel to open "Filter parameters".
To assign LFO to the filter or effect parameter tap the button "LFO" below the controls of filter. The LFO can be assigned to the two main parameters of each filter / effect. This is the same LFOs that you assign for oscillator parameters.
4. More secrets
When you want to get interesting effects with multi layered mode you can use phase shift for LFO assigned for specific parameter in all layers.
For example. When you set the samples for more than one layer and these layers are audible assign any LFO to parameter "Level" or "Balance" for all layers. For this tap the button "Layer all" on the panel "Oscillator parameters" then tap "LFO" below "Level" or "Balance". Set all LFO parameters just about as in example above.
Then in the panel "Oscillator parameters" select "Layer 1", tap button "LFO" and set some value (not so big) of parameter "Phase". And repeat this step for layer 2 and 3 with other values of phase.
In result this parameter for all layers will varying with the same rate but will differ in each layer. If you use this way for "Balance" it can adds very interesting spatial variations.
Feel free to experiment with SynthScaper and you will be able to get a more interesting result than with other synths.
See also:
[ SynthScaper - Wide and deep sound with the single preset (guide with pictures) ]
[ SynthScaper - Natural chorus and Spatial effects (guide with pictures) ]
[ SynthScaper - How to assign "LFO" to parameters (guide with pictures) ]
[ SynthScaper - How to use "Effect" parameters (guide with pictures) ]
[ SynthScaper - Two-Voiced Drone (guide with pictures) ]
[ SynthScaper - Start with your own samples (guide with pictures) ]
[ SynthScaper - The Designer tool (short description) ]
[ SynthScaper - Arpeggiator / Sequencer overview (video demo) ]
[ SynthScaper - Automate pitch shifting (video demo) ]
[ SynthScaper - One shot sample demo (video demo) ]
[ SynthScaper modules connection diagram (big picture) ]
[ Complete description of SynthScaper 1.6 in one PDF file ]

SynthScaper - Soundscapes synthesizer specially designed for creating and experiments with ambient soundscapes in wide range from noises to melodic instruments and everything in between.
The best way to start learning the work of LFO is to use the initial settings of all parameters so that the oscillator works in simple mode and no any settings affect to it. The special scene "Empty scene" set the initial values of all parameters. In this scene oscillators 1 and 3 are muted and for oscillator 2 is used only first layer with sine waveform. Filters, Envelopes and LFOs are not assigned (excluding base Envelope generator for parameter "Level").
If you are sure that you only need to know how to assign LFO to the parameters you can skip next step.
1. Set "Empty scene"
From the list of scenes select "Empty scene" to set all parameters to initial values.
You can click on any image to enlarge it
- On the main screen tap on area at the top with name of current scene.
- From the main list of scenes select "Empty scene". If the list is show content one of scenes group, tap the button "Back" above the list to go to the main list.
- Tap the button "Set" below to set the empty scene.
- Close the list by button "Close".
2. Select sample
Any LFO can be assigned to the oscillator parameters on the panel "Oscillator parameters" or assigned to filters parameters on the panel "Filter parameters".
- On the main screen tap button "Osc" on the left panel in area of oscillator 2 (in the middle of left panel).
- For this example will be used only layer 1. Tap button "Layer 1" to select this layer. All parameters in this panel below layers buttons will be applied only to the selected layer.
- If you select "Layer all" the value of each parameters below will be applied to all three layers, but only when you will change it.
- Tap the dashed area below to open the panel "Samples library" where you can select and set the sample for the current oscillator and current layer.
- In the "Samples library" you need to select the sample from built-in library. At the title of panel tap the button "Built-in" to switch on the list of built-in library. If you need to select the sample uploaded to this app use the button "User" to switch on the user library.
- Select the sample that differ from sine wave for more noticeable result. For example select the sample "Saw down" from the group "Generated".
- Tap the button "Set sample" to set the selected sample for oscillator 2 and layer 1.
3. Assign LFO
One of six LFOs available for each oscillator can be assigned to the parameters indicated at the bottom of panel. Below the title of each parameter there are buttons "Env" for assign envelope generator (ADSR) and LFO for assign low-frequency oscillator to this parameter. When LFO or Envelope are assigned to the parameter the button has green mark at the left corner and number of assigned LFO or Envelope generator will show.
- You can assign the same or different LFOs to each parameter of each layer. If you need assign the same LFO for the all layers select "Layer all" at the top of panel then assign LFO.
- Tap the button "LFO" below title "Level" to open LFO control panel.
- In the title of LFO control panel there are 6 buttons to select one of LFOs. Select LFO 1.
- Tap the button "Assign" to assign LFO 1 to the parameter "Level". When you close this panel the button below parameter "Level" will have green mark and title "LFO 1".
- Below button "Assign" there is knob which change value of parameter that you selected to assign LFO (ie value of "Level" in this example). This is the same value which you can set in oscillator control panel. Slightly decrease this value so that LFO can varying this parameter.
- Use knob "Range" to set the range in which LFO will varying this parameter. Each LFO has parameter "Depth" which set the level of variations of this LFO. Since the same LFO can be assigned for several parameters so you should use knob "Range" to set individual level of variations for each assigned parameters.
- Use button "Short" to set short range of rates for this LFO. Then set some rate by knob "Rate".
- Set the depth of LFO variations by knob "Depth". You will see the changing of LFO graph (brown) and changing graph of parameter "Level" (green). If you change the knob "Range" only graph of the parameter variations will changing.
The value of each parameter on which LFO can be assigned you can set not only in LFO control panel but also in the panel "Oscillator parameters" on the ring control at the left on that panel (excluding parameter "Pitch").
Also on this control green marks indicate actual value of parameter. Actual value will differ from base value which you set when this parameter will changing by LFO, Envelope generator (ADSR) or when controls Effect 1 / 2 will be assigned to this parameter.
Each oscillator has three slot for filters / effects. You can select filters and effects in the panel "Filter parameters". On the main screen tap button "Flt" next from button "Osc" on the left panel to open "Filter parameters".
To assign LFO to the filter or effect parameter tap the button "LFO" below the controls of filter. The LFO can be assigned to the two main parameters of each filter / effect. This is the same LFOs that you assign for oscillator parameters.
4. More secrets
When you want to get interesting effects with multi layered mode you can use phase shift for LFO assigned for specific parameter in all layers.
For example. When you set the samples for more than one layer and these layers are audible assign any LFO to parameter "Level" or "Balance" for all layers. For this tap the button "Layer all" on the panel "Oscillator parameters" then tap "LFO" below "Level" or "Balance". Set all LFO parameters just about as in example above.
Then in the panel "Oscillator parameters" select "Layer 1", tap button "LFO" and set some value (not so big) of parameter "Phase". And repeat this step for layer 2 and 3 with other values of phase.
In result this parameter for all layers will varying with the same rate but will differ in each layer. If you use this way for "Balance" it can adds very interesting spatial variations.
Feel free to experiment with SynthScaper and you will be able to get a more interesting result than with other synths.
See also:
[ SynthScaper - Wide and deep sound with the single preset (guide with pictures) ]
[ SynthScaper - Natural chorus and Spatial effects (guide with pictures) ]
[ SynthScaper - How to assign "LFO" to parameters (guide with pictures) ]
[ SynthScaper - How to use "Effect" parameters (guide with pictures) ]
[ SynthScaper - Two-Voiced Drone (guide with pictures) ]
[ SynthScaper - Start with your own samples (guide with pictures) ]
[ SynthScaper - The Designer tool (short description) ]
[ SynthScaper - Arpeggiator / Sequencer overview (video demo) ]
[ SynthScaper - Automate pitch shifting (video demo) ]
[ SynthScaper - One shot sample demo (video demo) ]
[ SynthScaper modules connection diagram (big picture) ]
[ Complete description of SynthScaper 1.6 in one PDF file ]

Subscribe to:
Posts (Atom)
